Configure Local Dev Env with WordPress
December 2015 · 3 minute read
After spending two weeks working out how to get a basic wordpress website set up for local development and deployment, I’m going to share the few simple steps which are actually needed to get going. Once you can get one wordpress working how you want, you can certainly get any number of them to run. First up, ensure you have the following services installed:
- Apache2
- php5.6
- MySQL2
Now, you can download wordpress and get it set up in the correct location.
Download latest .gzip WP release from github.com
https://github.com/WordPress/WordPress/releases
In the commnad line, move that file from downloads to working dir
$ mv ~/Downloads/WordPress-3.7.11.tar.gz ./
Extract the zip file
$ tar -xzf WordPress-3.7.11.tar.gz
Remove the original zipped file that is no longer required
$ rm WordPress-3.7.11.tar.gz
Rename the folder to your site/ projects name
$ mv WordPress-3.7.11 testsite.com
Change dir into your directory and check that all the correct files are in the correct place
$ cd testsite.com/
$ ls
You can see that you now have a wordpress on your local machine. Time to create a database, configure the wordpress and host files before committing the first instance to git.
You’ll need to create a MySQL db for this project.
Log into MySQL from the command line, you’ll have to enter your password
$ mysql -u selenasmall -p
Have a look to see what databases are available in your MySQL
$ show databases;
Create a new database for your new wp site
$ create database testsitecom;
Next, you can configure your WordPress
Open your project in sublime text2, or your preferred text editor and edit the wp-config-sample.php file
Change the file name to wp-config.php
Update the file contents to have the same credentials you just configured in your new mySQL database.
And finally, configure your host file
From the command line, navigate to your user’s Sites dir
$ cd ~/Sites/
Using nano as the text editor, the following command will allow changes to the virtual host config file
$ sudo nano ./httpd-vhosts.conf
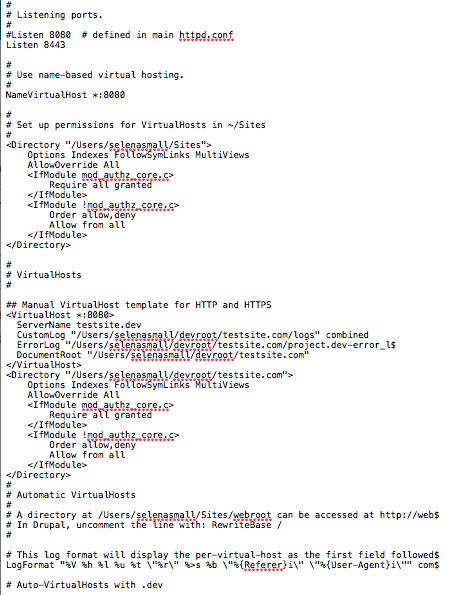
Once inside the file, you can update the configuration, add new ports and configure each site to listen on different ports so they can all run at the same time. Here is an example of how the httpd-vhosts.conf file should look in the text editor. This example, has only 1 port configured - localhost:8080
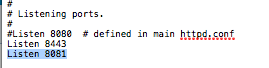
To add extra ports for other developments, simply repeat line 5 with another port options ie:
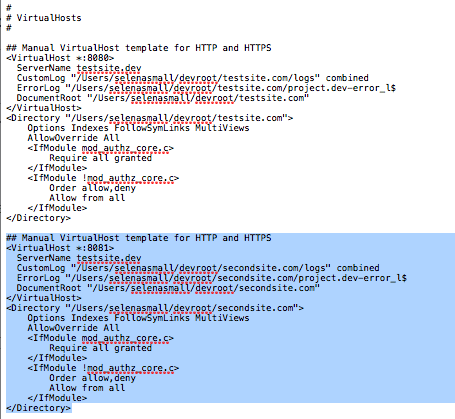
And configure a second virtual host using that new port ie:
Now that all necessary services are present and configured, it’s time to restart the server and check out the new development wordpress site.
Restart the Apache2 server from command line
$ httpd -k restart
In your web browser, navigate to the port you have specified above (8080) and you will see your new site
Before you go ahead and make any changes or try to develop a new theme, this is probably a good time to commit your working project to git. There are a few different git hosts you can use, which have different benefits. Github is a great tool, in particular for open source projects but unfortunately, doesn’t offer free private repositories. If you’re developing something private, I would recommend trying out bitbucket which works in a very similar way to github but allows for unlimited free private repos for small teams or individuals.
You can sign up for your free account at https://bitbucket.org/
Simply follow the instructions to commit your new project. Remember, if you planning to actually deploy this site, you don’t want to commit the config file because it is probably going to be different on your live sites server. You might also want to omit the log files which can be costly on space.
*Refs
https://echo.co/blog/os-x-1010-yosemite-local-development-environment-apache-php-and-mysql-homebrew
*Useful Error Reference
http://www.wpbeginner.com/wp-tutorials/how-to-fix-the-wordpress-white-screen-of-death/