Set up mySQL
December 2015 · 2 minute read
The following example will demonstrate how to manually set up mySQL database with Symfony2 and mySQL2 for a specific bundle in your application.
1. Create database with mySql in your terminal:
Log into your mySQL server using the following command and provide your user password
$ mySql -u selenasmall -p
Take a look to see what tables are currently available in your database
$ show databases;
Create a new database for your new project
$ create database pandemuerto_php;
Check back to ensure that the creation of your new database worked correctly
$ show databases;
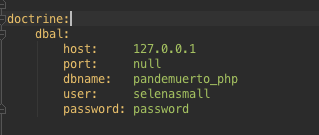
2. Configure the config_dev.yml file in your project to include your database settings
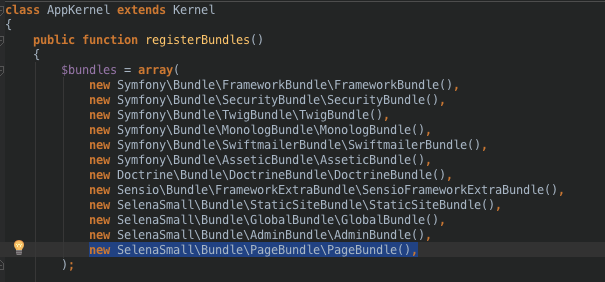
3. Include the bundle you’re writing the database for into AppKernel.php in your project
new SelenaSmall\Bundle\PageBundle\PageBundle(),
4. Back in the terminal, open a new tab, move into your project’s directory
$ cd devroot/php-projects/custom_restaruant_website
Validate the new database schema
$ php app/console doctrine:schema:validate –env=dev -force
Any time you make changes to entities, such as the addition or alteration of new traits, you need to update the database schema again. (This works similarly to Active Record Migrations with Ruby on Rails)
$ php app/console doctrine:schema:update –env=dev —force<
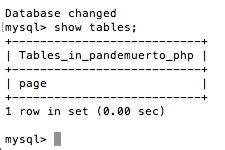
6. Back in the mySQL terminal, if you check your projects database, you’ll now see a new table. Each table represents a separate bundle
$ use database pandemuerto_php;
$ show tables;
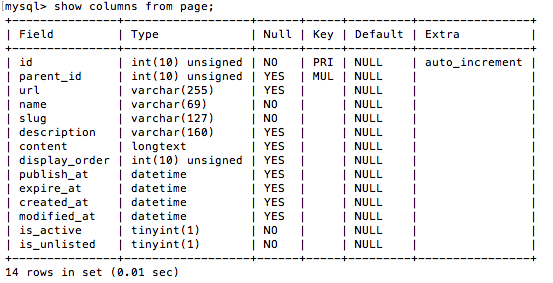
You can see any new traits which have been added to any individual bundle in your database along with additional settings which have been added to them.
$ show columns from page;
7. Clear the cache the project directory for the dev environment we’ve been working with
$ php app/console cache:clear –env=dev